Hosted Checkout
Let's get started with Volume in less than 5 minutes!.
If none of Volume's SDKs cover your technology, or you want to simply redirect users to Volume's Hosted Checkout page, follow the instructions below.
Create the Payment Data
Prepare an object which will contain all the necessary data to process a payment through Volume. The example below is written in Javascript, but using Javascript is not obligatory.
    const merchantPaymentId = "merchant-correlation-id";
    const applicationId = "83b16548-0a0a-11ee-be56-0242ac120002";
    const amount = 49.99;
    const currency = "GBP";
    const reference = "payment ref";
    const metadata = {
        "mydata": "myvalue"
    };
    const merchantName = "Merchant Name";
    const showCancelButton = true;

    const paymentData = {
        applicationId,
        merchantPaymentId,
        paymentRequest: {
            amount,
            currency,
            reference // a string, max 18 characters long
        },
        metadata,  // Optional, max 5000 chars after serialization
        merchantName,
        showCancelButton //Optional
        merchantProvidedPayerDetails: {
            email: 'john.doe@example.com',
            name: 'John Doe',
            phone: '+44 20 7946 0958',
            account: {
                holderName: 'John Doe',
                accountNumber: '12345678',
                sortCode: '123456',
                iban: 'DE89370400440532013000'
            },
        }
        address: {
            addressLine1: '123 Main Street',
            addressLine2: 'Apt 4B',
            countryCode: 'GB',
            town: 'London',
            postCode: 'SW1A 1AA'
        },
        useForUxFlowOptimisation: true
}| key | type | constraints | example | description |
|---|---|---|---|---|
| applicationId | string | "83b16548-0a0a-11ee-be56-0242ac120002" | Your application id which corresponds to selected Volume environment. | |
| merchantPaymentId | string (Optional) | Max 50 chars, unique per payment | "954f8fe6-0a0a-11ee-be56-0242ac120002", "2022/7/4-16:20" | Pass a merchantPaymentId to associate a unique identifier for the payment, this will be returned to you in any webhook or api responses for the given payment. |
| amount | number | Min 0.01, up to 2 decimal places | 12.99 | Amount to be paid, ie £1.00. |
| currency | string | ISO 4217 | "GBP" | Currency of payment. |
| reference | string | Max 18 chars, Alphanumeric | ABC-123 | Pass a bank transfer reference, it will be visible by both a client and Merchant in bank transfer history. |
| metadata | json object (Optional) | Max 5000 chars length after serialization to string | { "mydata": "myvalue" } | metadata is an optional JSON object which will be passed back in webhooks as paymentMetadata. Detailed description below. |
| merchantName | string (Optional) | "My Merchant Name" | Your company name which will be visible on top of the hoster checkout page. If value is not provided, nothing will be displayed. | |
| showCancelButton | boolean (Optional) | true / false | If this parameter is set to true and there is a cancelUrl set in the MerchantPortal, then a CANCEL button will be displayed underneath the bank seletion list. | |
| merchantProvidedPayerDetails | json object (Optional) | Example below. | Detailed description below. |
Merchant Provided Payer Details
The merchantProvidedPayerDetails parameter allows merchants to pre-populate payer information to optimize the user experience during payment flow. This is also required to gain access to Volume's Confirmation of Payer feature, and to enable the search and filtering of payments by these details.
Key Benefits
- Faster UX: Automatic bank detection based on provided IBAN for EURO payments
- Improved Conversion: Pre-filled forms reduce user friction
- Confirmation of Payer: Verify the identity of account holders against your KYC data
Usage
merchantProvidedPayerDetails: {
  email: 'john.doe@example.com',
  name: 'John Doe',
  phone: '+44 20 7946 0958',
  account: {
    holderName: 'John Doe',
    accountNumber: '12345678',
    sortCode: '123456',
    iban: 'DE89370400440532013000'
  },
  address: {
    addressLine1: '123 Main Street',
    addressLine2: 'Apt 4B',
    countryCode: 'GB',
    town: 'London',
    postCode: 'SW1A 1AA'
  },
  useForUxFlowOptimisation: true
}
metadata
metadata is an optional JSON object which will be passed back in webhooks as paymentMetadata.
metadata must be a valid JSON object, so these values are not allowed:
    metadata: 1
    metadata: "test"
    metadata: [1,2,3]
metadata can be nested. This object is a valid example:
    metadata: {
        "id": "0001",
        "type": "donut",
        "name": "Cake",
        "batters":
            {
                "batter":
                    [
                        { "id": "1001", "type": "Regular" }
                    ]
            },
} <script src="https://js.volumepay.io"></script>Encode Payment Data
Encode the previously created payment data to Base64 format.
    const paymentData = {...}
    const encoded = Buffer.from(JSON.stringify(paymentData)).toString("base64");
Compose the URL
Now, compose the URL address which will redirect the user to Volume's Hosted Checkout.
The address differs based on the environment:
    const composeVolumeBaseUrl = (volumeEnvironment) => {
      switch (volumeEnvironment) {
        case "live":
          return "https://confirm-payment.volumepay.io/";
        case "sandbox":
          return "https://sandbox.confirm-payment.volumepay.io/";
      }
    };

    const baseUrl = composeVolumeBaseUrl("live");
const url = baseUrl + "?ref=" + encoded;| environment | base url |
|---|---|
| LIVE | https://confirm-payment.volumepay.io/ (opens in a new tab) |
| SANDBOX | https://sandbox.confirm-payment.volumepay.io/ (opens in a new tab) |
The encoded part should be passed as a query parameter called ref.
URL = {base_url}?ref={encoded}The final url can be used in any flow required by your application.
Regenerating Merchant Payment ID
It is very important to remember that merchantPaymentId is unique per payment.
In the situation, when user opens the Hosted Checkout page, creates the payment and then navigates back to the original page/application, the same URL cannot be used as it contains an already utilised merchantPaymentId.
It is necessary to regenerate the Hosted Checkout URL using a new merchantPaymentId each time the user creates the payment.
Pseudocode for MerchantPaymentId regeneration:
const merchantPaymentId = generateNewMerchantPaymentId();
const paymentData = {
...
merchantPaymentId
...
};
const encoded = Buffer.from(JSON.stringify(paymentData)).toString("base64");
const url = baseUrl + "?ref=" + encoded;
...
...
<a href={url} onClick={() => {
newUrl = regenerateUrlWithNewMerchantPaymentId();
setUrl(newUrl);
}>
MAKE PAYMENT
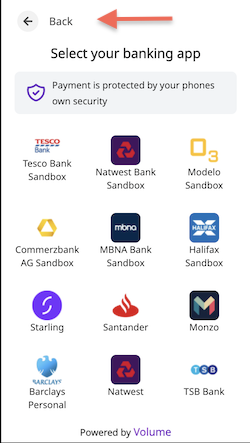
</a>Hosted Checkout look
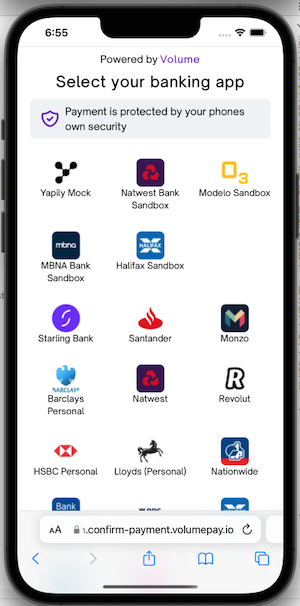
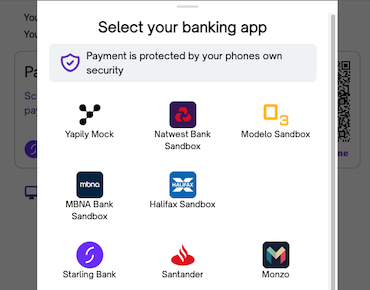
If the Hosted Checkout page opens on a mobile device, user will see a list of bank institutions.
After selecting a certain institution, if the user's device has this bank's application installed, the user will be redirected to the bank's app. Otherwise, the bank's webpage will open.
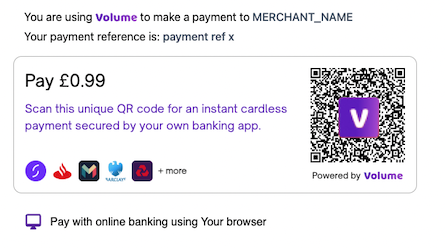
If the Hosted Checkout page opens on a desktop device, the user will see a QR code which can be used to redirect the flow to a mobile device. The user can also choose to login to the banking institution via a desktop website.
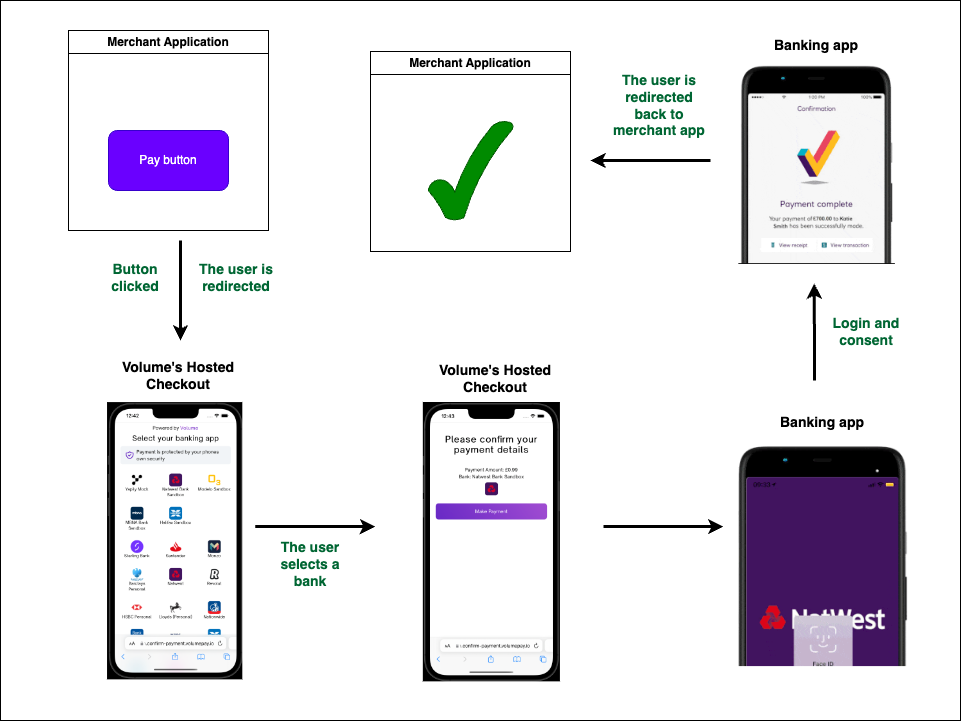
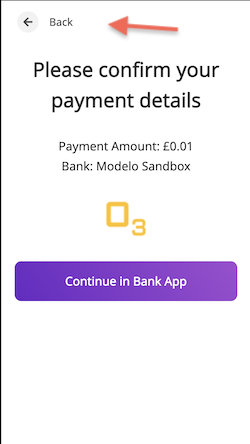
Hosted Checkout payment flow
The Hosted Checkout payment flow contains:
- a redirection of the user to the Volume's Host Checkout page
- choosing a banking institution
- logging to the banking application and approving the payment
- the user redirection back to Merchant's callback page
Every payment status change triggers a signed webhook call from Volume's backend to the Merchant's API - just like any other Volume's payment flow.
Cancel Button
PREREQUISITE:
To be able to display and use the Cancel Button the destination url needs to be set. It can be done in the Merchant Portal in Settings -> Webhooks and Callbacks tab.
Without this value, the button cannot be displayed.
If the property showCancelButton: true is set and Cancel Url value is persisted in Merchant Portal, then a button will be displayed at the bottom of the page.
After clicking the button, user is redirected to the Cancel Url and no payment is created.
Important thing to remind here is that no payment is created before a certain bank icon is selected. So if Cancel Button is pressed on the bank selection list, no data will be persisted.
If user selects an institution, is redirected to the bank application and - using a task manager - switches to the merchant application, and subsequently clicks the Cancel Button on the Confirm Bank page - we do not have control over the state of the payment. It will depend on the moment user stopped the flow in the bank application.
Testing
After you have completed the steps above, then you can start testing.
We strongly recommend to use sandbox environment before switching to live environment.
Please note that sandbox testing will not open the Banking app due to lack of testing environment offered by the different banks in the UK. However, a successful test will open the bank environment via the browser. The user experience will differ bank by bank. Ask us more information at support@getvolume.com or use the chat in this page to get immediate assistance.
Please check Sandbox Banks Credentials to be able to test with Natwest Sandbox and other sandbox banks.